

These experts helped us to
create our product content:
OmniFlex Virtual Terminal Review
Virtual terminals are what they sound like – a way to accept credit cards through a “virtual” machine, such as a desktop computer, laptop, or tablet. These devices become the credit card “terminal.” Virtual terminals are popular for businesses that don’t need or want dedicated processing equipment. They’re common in medical practices, small service businesses such as mechanics and contractors, and with businesses that take orders by mail or phone. If you’re new to virtual terminals, start with our primer Virtual Terminals for Credit Card Processing.
When it comes to the OmniFlex virtual terminal, there isn’t a lot of readily available information online. FIS (Worldpay’s parent company) references the OmniFlex solution as a whole on its website, but pages about the Virtual Terminal lead to a page with a 404 error or require login to view more information.
However, CardFellow obtained access to a test account in order to see the features and assess user-friendliness firsthand. In this OmniFlex virtual terminal review, we’ll look at the terminal’s features, processor compatibility, and costs to help you determine if it’s the right fit for your needs.
Features
While virtual terminals don’t always have the range of bells and whistles you may find in a full-fledged point-of-sale system, the OmniFlex virtual terminal still has many helpful features that make it a good choice for many businesses. Basic transaction processing, recurring payments, and invoice management are the key features for accepting payments. Order management - with convenient product catalogs and variant options - and customizable reporting with a choice of export formats round out the offering. Let’s take a look at each of these features in more detail.
Payments
For the basic “process transaction” feature, you’ll be able to choose whether to accept a credit card, cash, or a check. You can easily record all three types of payments, which helps for consolidated financial reporting later.
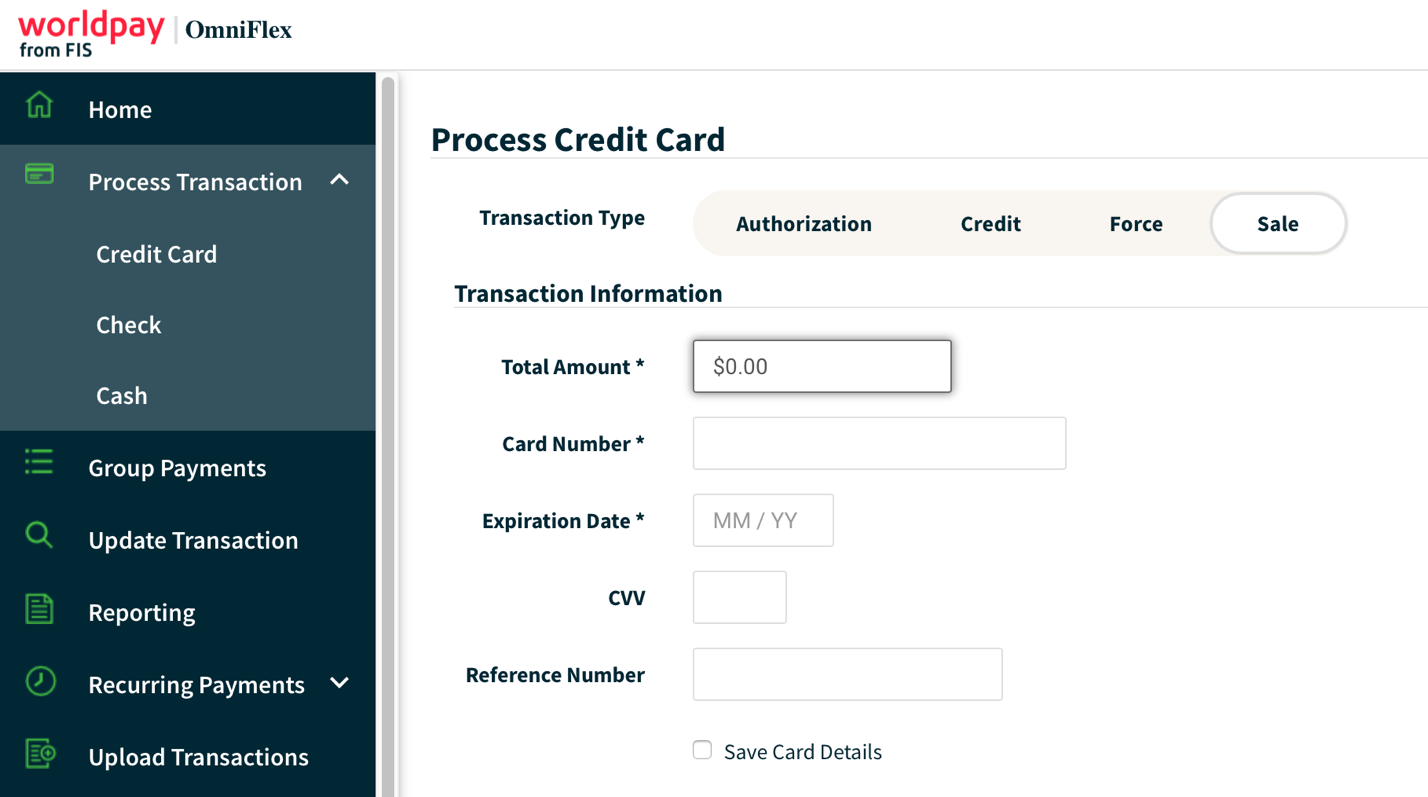
Below you’ll find the payment entry screen for one-off sales at your business. These are for single transactions. The entry screen is intuitive. (Screenshot below.) It first asks for the type of transaction, with the default set to “sale.” (However, you’ll also have options such as “Authorization” if you’re looking to simply pre-authorize a card payment.)
You’ll enter the amount, the customer’s card number, the expiration date, card verification value (CVV) code, and, optionally, a reference number. Note that the CVV is also an optional field, but in some cases it can help you fight unwanted chargebacks and prevent fraud.
Once you’ve entered those initial details, scrolling down reveals collapsed sections to fill out. (Screenshot below.) All of the additional sections are set to optional by default, and include billing address / information, shipping address / information, custom fields, level 2 and level 3 data information, and receipt details.
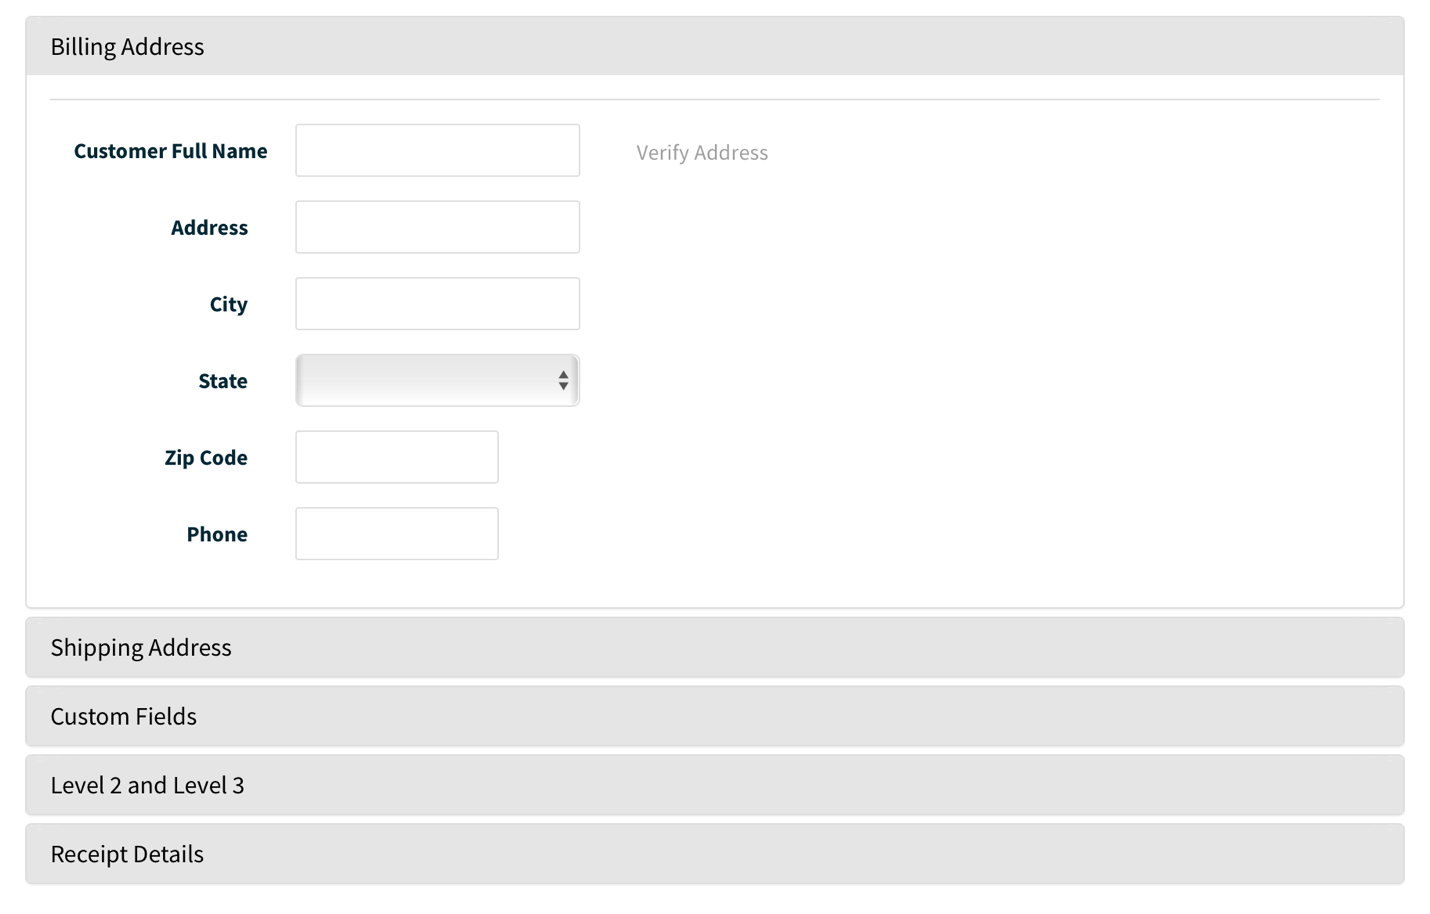
The “Custom Fields” section gives you the opportunity to add fields relevant to your specific business and orders. Some suggested fields include identifiers about items - such as color or size – or details like unit or lot numbers. You can choose your custom fields as either freeform text or dropdowns.
The “Level 2 and Level 3” section refers to what’s called Enhanced Data. This is important for businesses that accept a lot of commercial credit cards. You can read detailed explanations of Level 2 and Level 3 enhanced data in our blog, but for a quick summary: Commercial cards require that a business provide additional information about the transaction in order to receive the best possible interchange rates for accepting the commercial card. Businesses that don’t pass along that additional information will not hit those target interchange categories, subsequently paying more to accept a commercial card than they may have otherwise paid.
Level 2 details that may be required include information such as purchase order numbers, customer codes, and tax amount paid. Level 3 requires all of the information needed for level 2, plus additional details such as discounts, shipping costs, and more. Click here to read more about Level 3 credit card processing specifically.
Recurring Payments
Looking to save customer information to set up recurring payments for subscriptions or memberships? The OmniFlex recurring payments option lets you set up customers in a recurring payment customer database and add either checking accounts or credit cards to initiate the recurring payments.
The information is stored securely and allows you to easily initiate subsequent payments using the Pay Now option or a set time period payment. (Such as weekly or monthly.)
A section for failed payments keeps you informed of any recurring payments that were unsuccessful, providing information on the customer, expiration date, payment method, frequency of the payment, amount, the reason for failure, and the date of the payment.
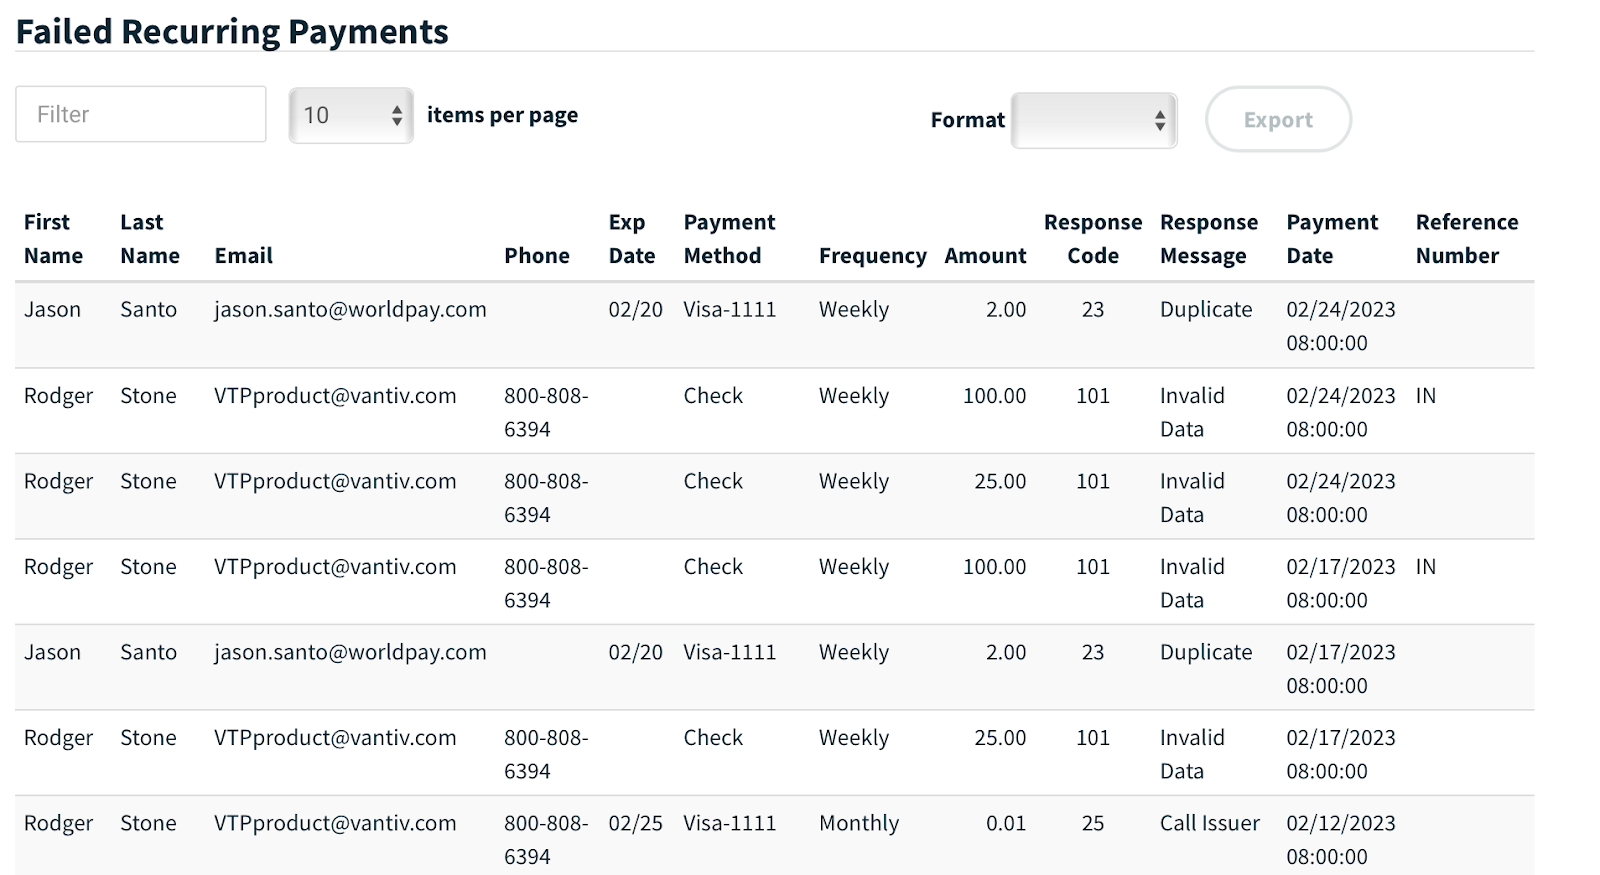
From there, you can choose to follow up with the customer to fix the issues and ensure successful payments going forward.
Invoice Management
If your business invoices customers for payment rather than charging at the time of service, you can easily create and manage invoices right in the OmniFlex virtual terminal. Electronic invoices can be sent by email or to a cell phone and contain a link to a secure online form for payment. Once a customer pays, you’ll receive a notification.
The invoice creator form itself is straightforward, giving you space to include your business name, address, and phone number. (Screenshot below.) By default, an invoice number and your registered email with OmniFlex are pre-populated and can’t be changed.
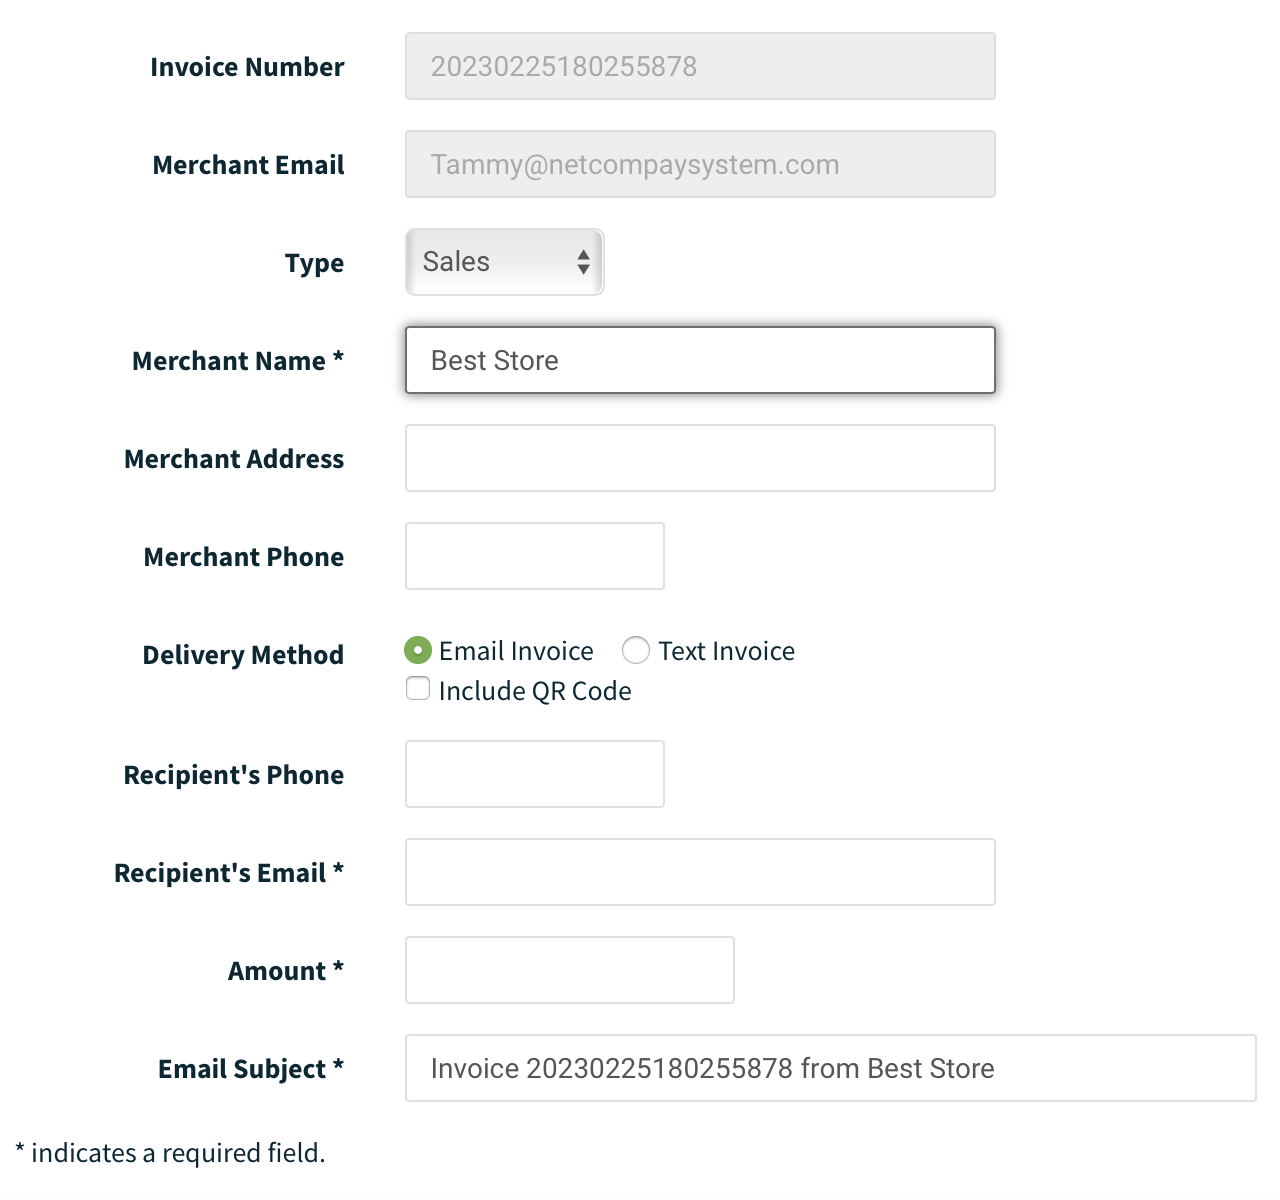
You’ll also choose whether to email or text the invoice, and have the option to include a scannable QR code. Lastly, you’ll enter details about the recipient of the invoice (email or phone will be required depending on the delivery method you choose) as well as the amount of the order. If you chose to email the invoice, you’ll also be required to enter an email subject line.
Once you’ve created and sent invoices, you can use the Manage Invoices section (screenshot below) to view or cancel invoices. Invoices you’ve sent will be listed in order of creation date (newest first) but you also have the option to search all invoices through a very convenient filter box. That box lets you type in any information (recipient email, invoice number, amount, delivery method, status, date, type…) and shows the matching invoices.
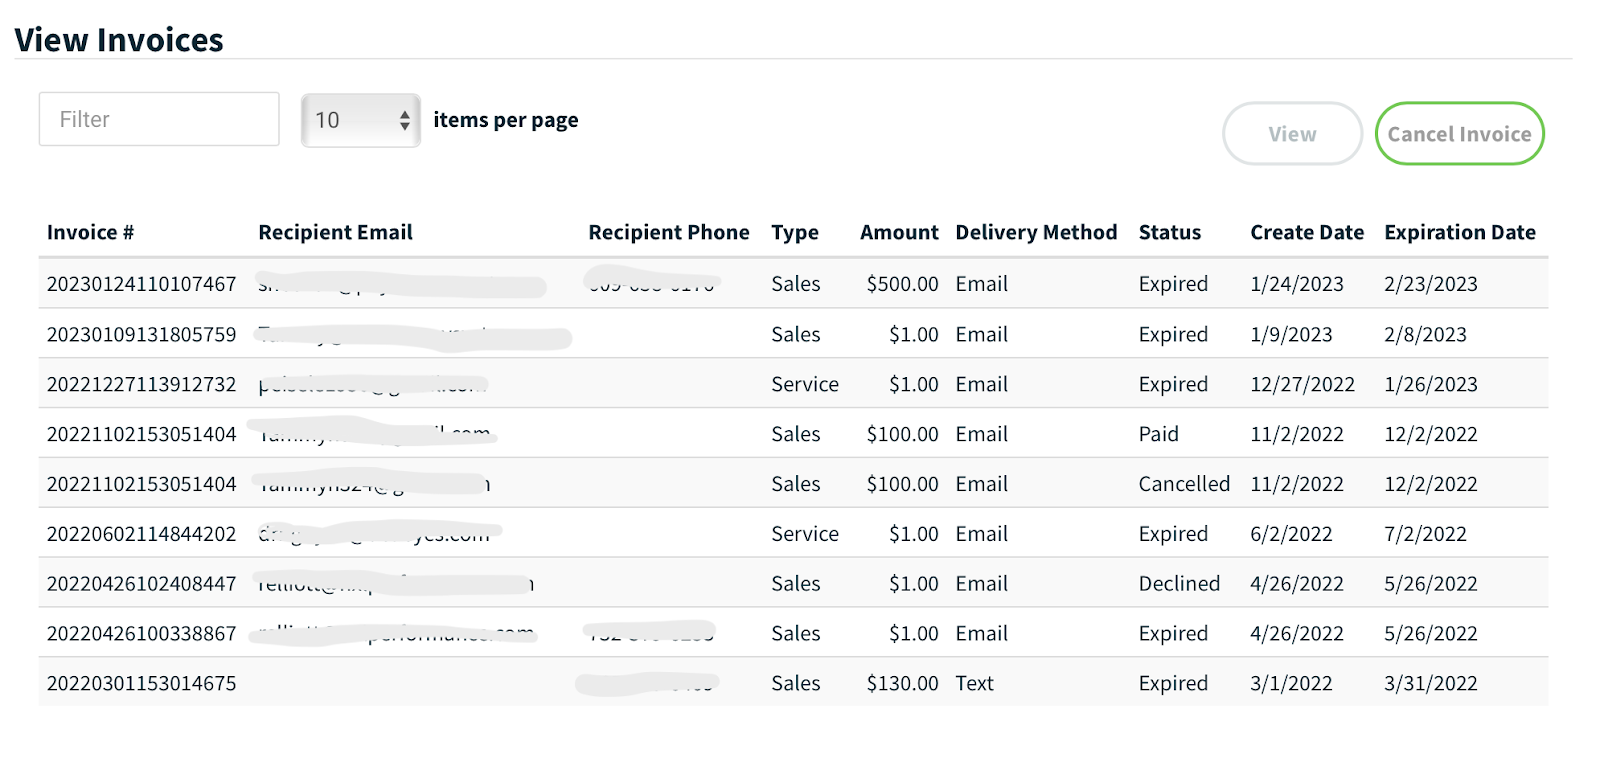
From there, you can click into any individual invoice for further details. You can also choose to cancel an invoice. Note that only invoices in some open status can be cancelled. The Manage Invoices section maintains the record of the cancelled invoice.
Order Management
The Order Management section is where you’ll catalog your goods or services to more easily track customer orders. A store setup function lets you begin organizing your hosted online page, while the product catalog (and product variants) are where you’ll be able to add, delete, and manage individual items. The product catalog allows you to add items for sale, while the product variants section is where you can set up parameters that apply to specific versions of the same product. (For example, a t-shirt in different sizes.)
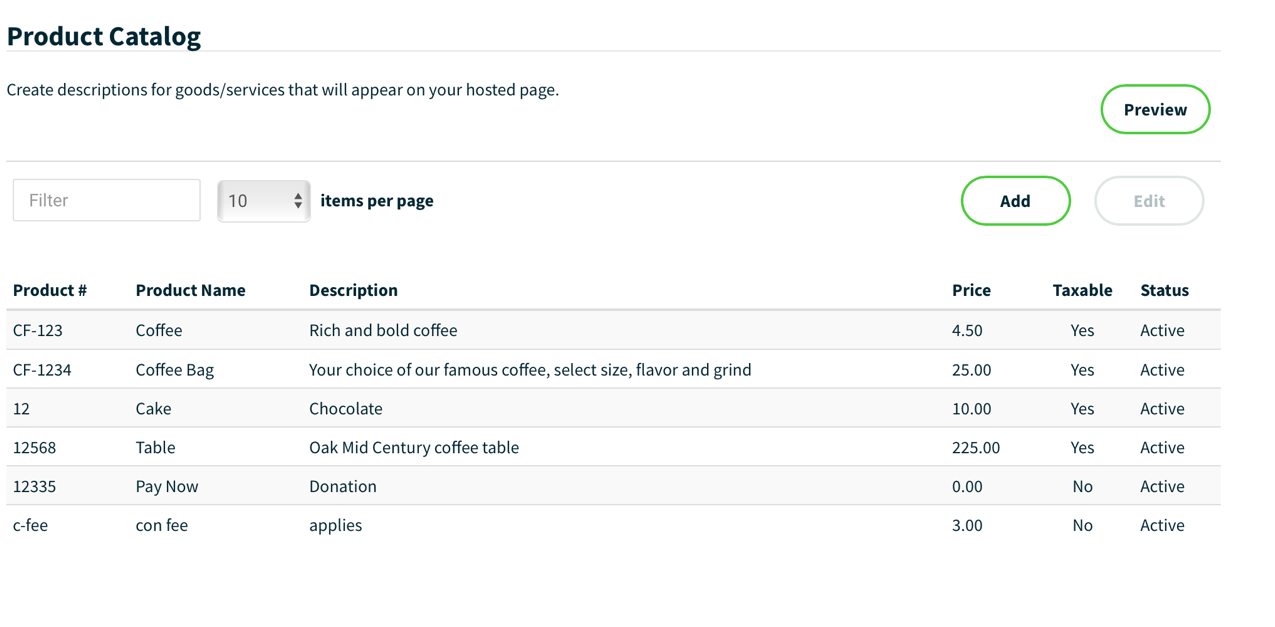
In the product catalog section (screenshot below) you’ll see example product numbers with product names, descriptions, prices, whether the item is taxable, and if the item is an active product.
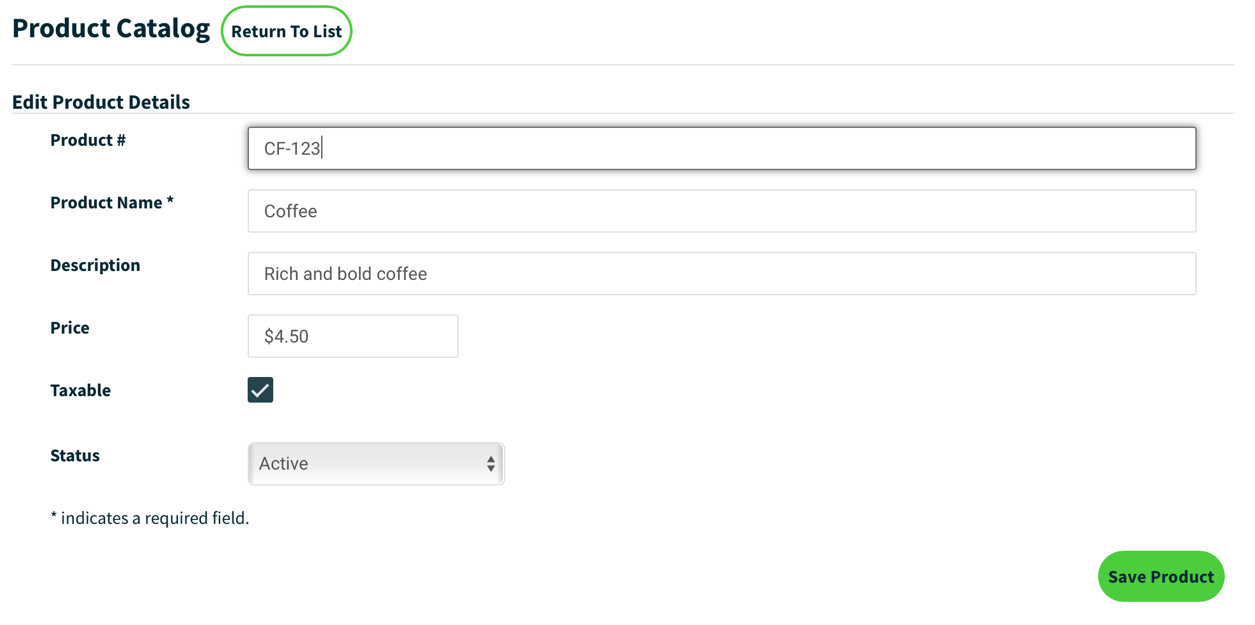
From there, you can click into any individual item to edit details or view the variants that relate to that specific item. For example, clicking into the first product, a Rich and Bold Coffee, shows us editable fields for that item. (Screenshot below.)
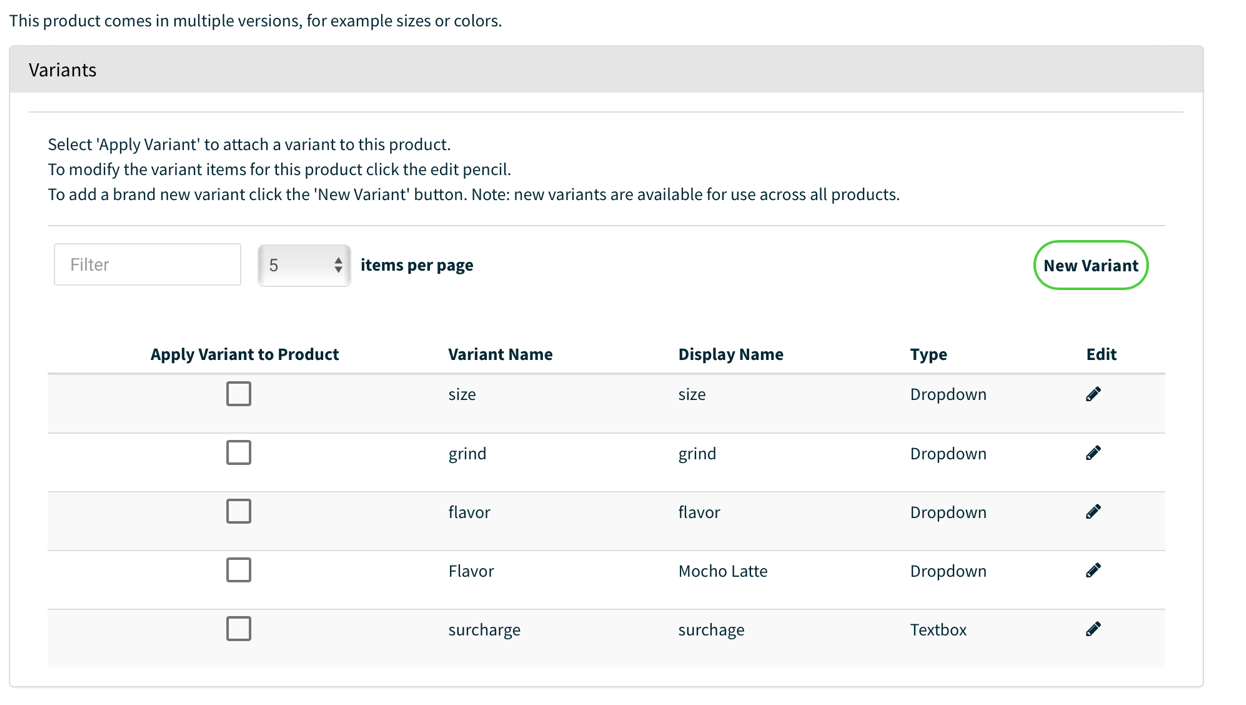
If we scroll down, a section for variants tells us of any other versions of this product. (Screenshot below.) In the case of coffee, variants include things like grind type or bag size.
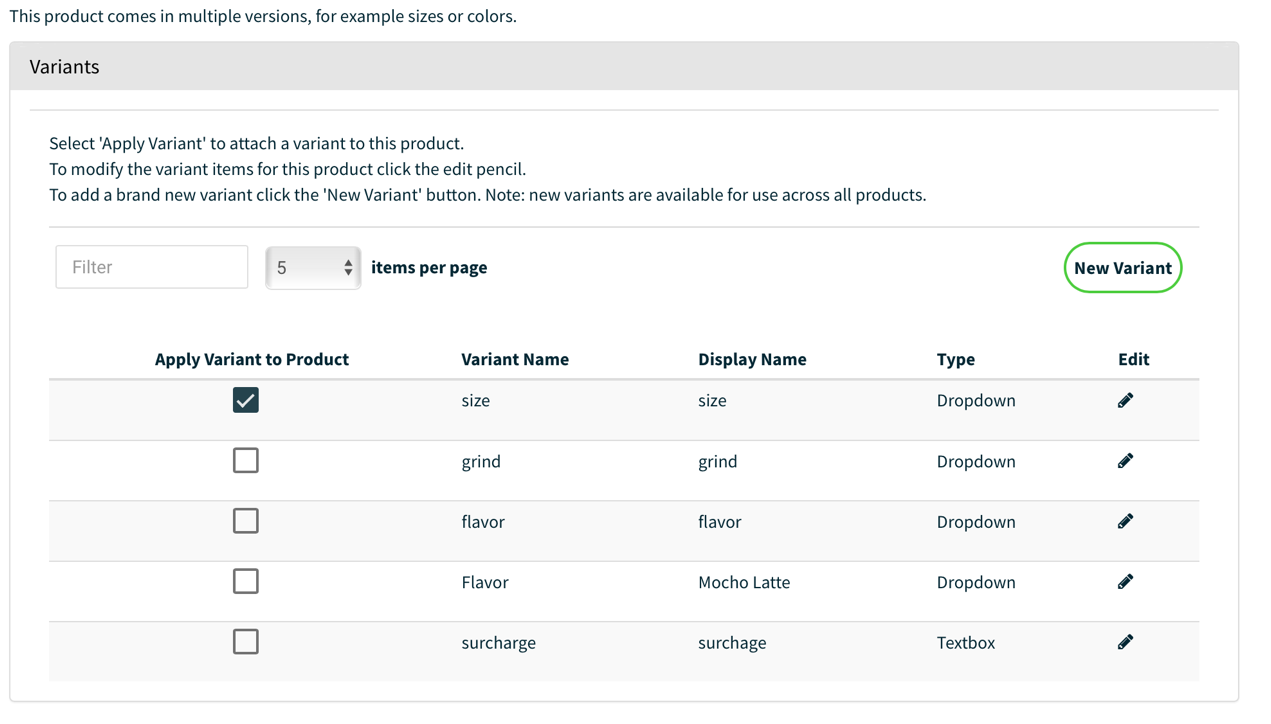
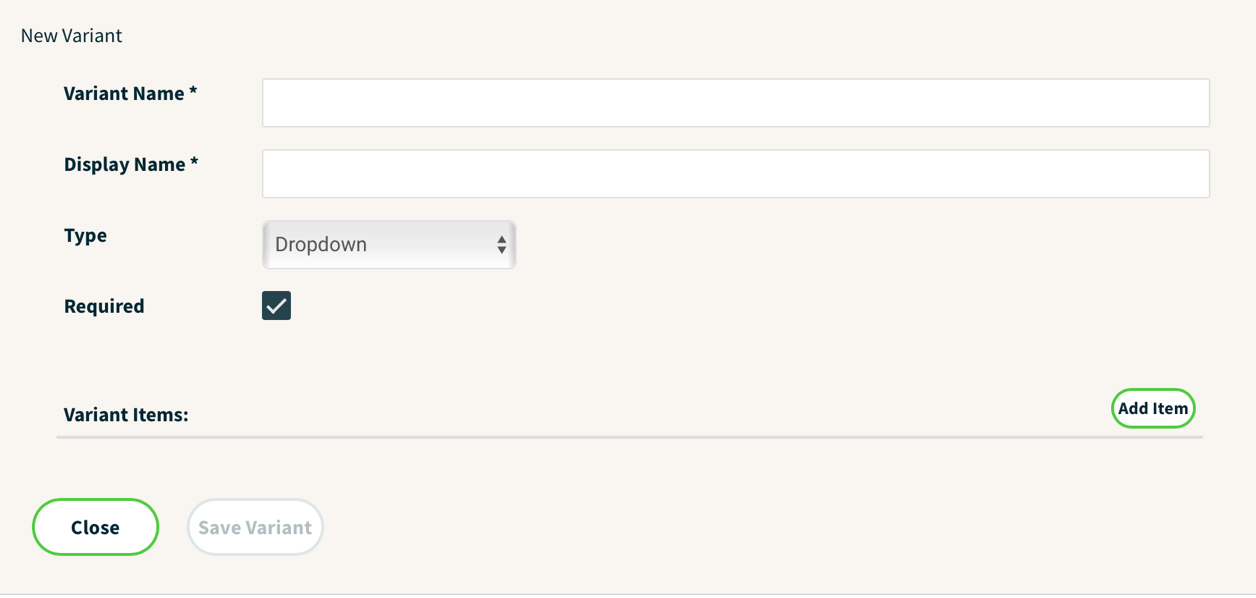
The variants section lists what possible variants are options from your variants catalog. You can simply check a box to indicate that a specific variant applies to this product. Need a variant that isn’t in your product variants list yet? Just click “New Variant” to create a variant. (Screenshot below.)
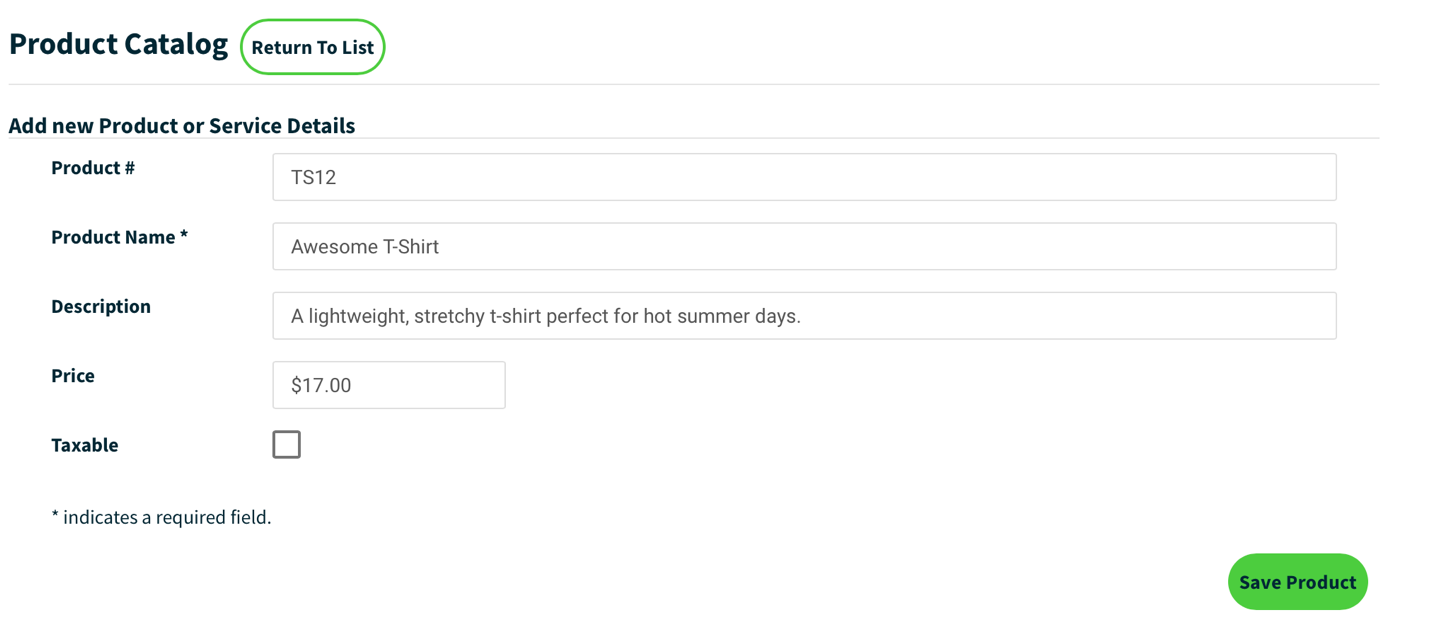
Heading back to the main product catalog section, you’ll see an option for Add Item. The entry screen is intuitive, requiring you to enter a product number, name, description, cost, and whether the item is taxable. (Screenshot below.)
If you scroll down further, you’ll see the variants section to choose whether there are relevant versions of the product. In this case, for a t-shirt, size is an appropriate variant. To ensure that all of the sizes sold are part of the Size variant, you can click on the pencil in the “Edit” column next to the variant.
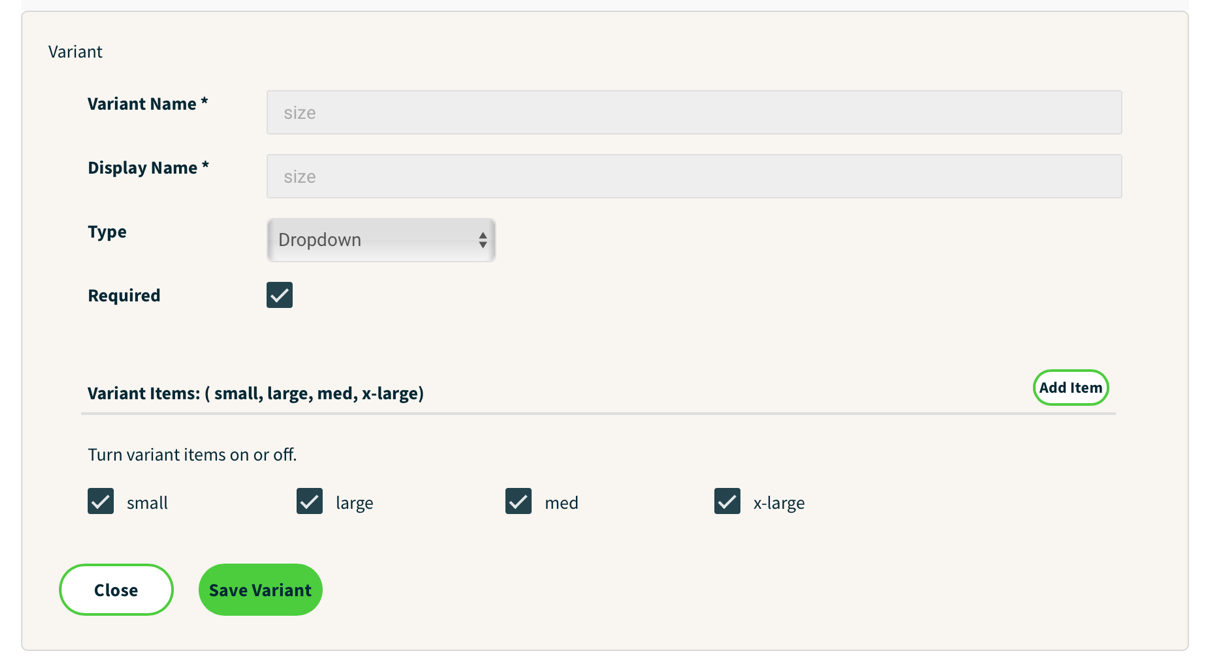
The variant shows available sizes of small, medium, large, and extra-large. (Screenshot below.) If the shirt is not available in one of those sizes, you can simply unselect it and it will not be a choice in the dropdown when a customer looks to purchase that shirt.
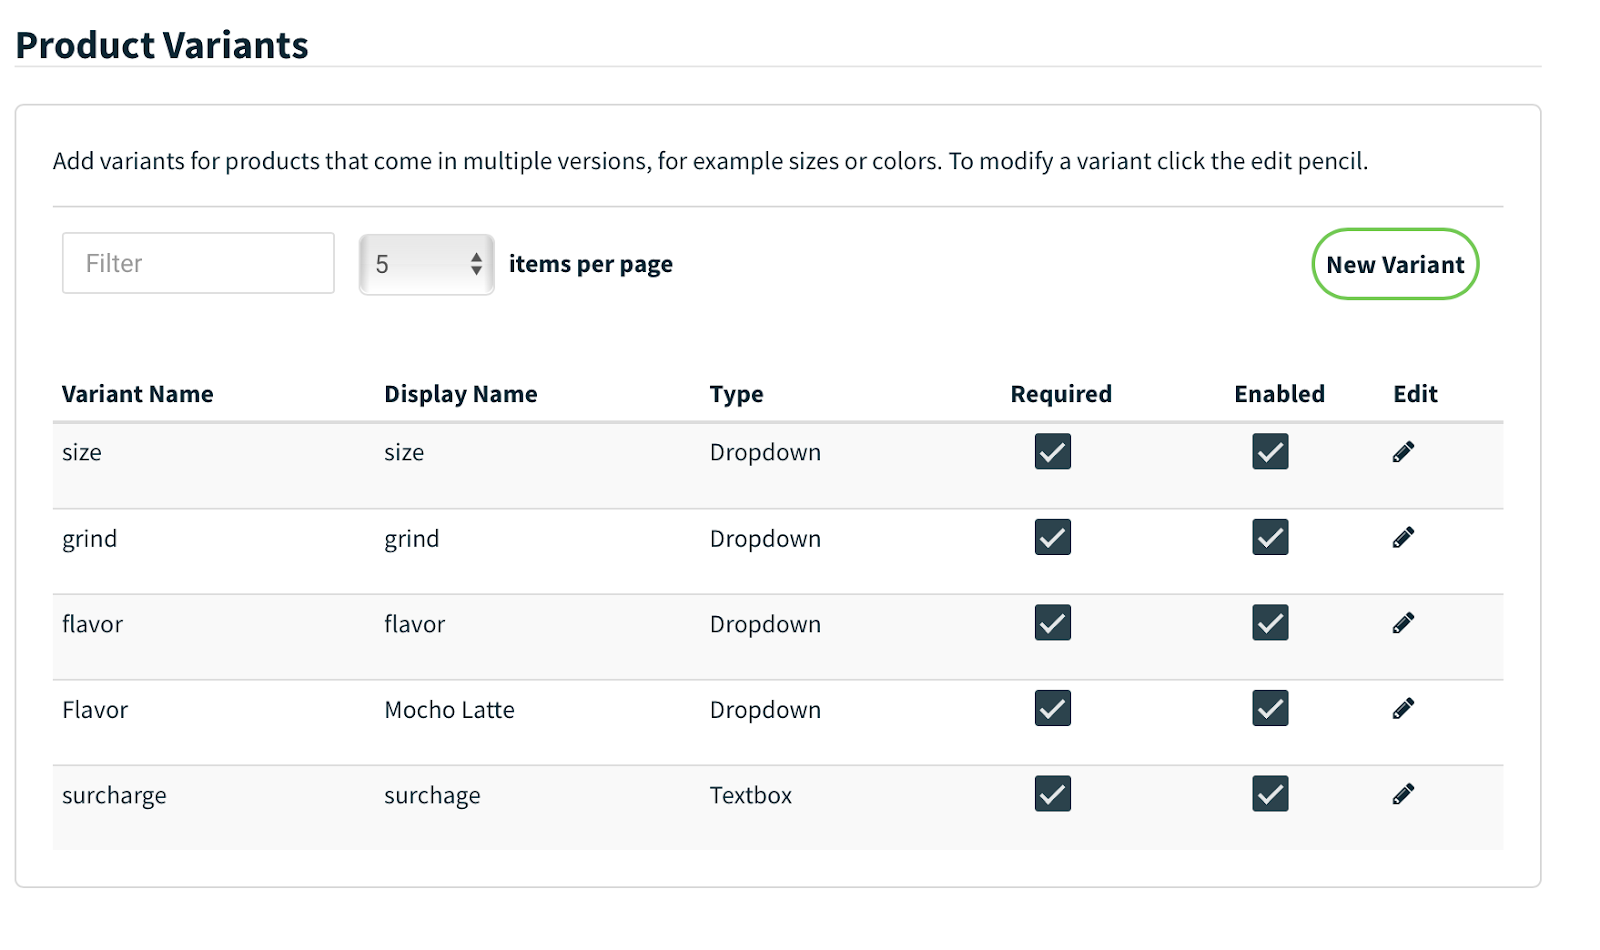
Finally, let’s take a quick look at the product variants list itself. As you can probably guess from the way that everything else is set up, the variants section is a list of all the product variants, showing their type, name, whether they’re required, and if they’re currently enabled. (Screenshot below.)
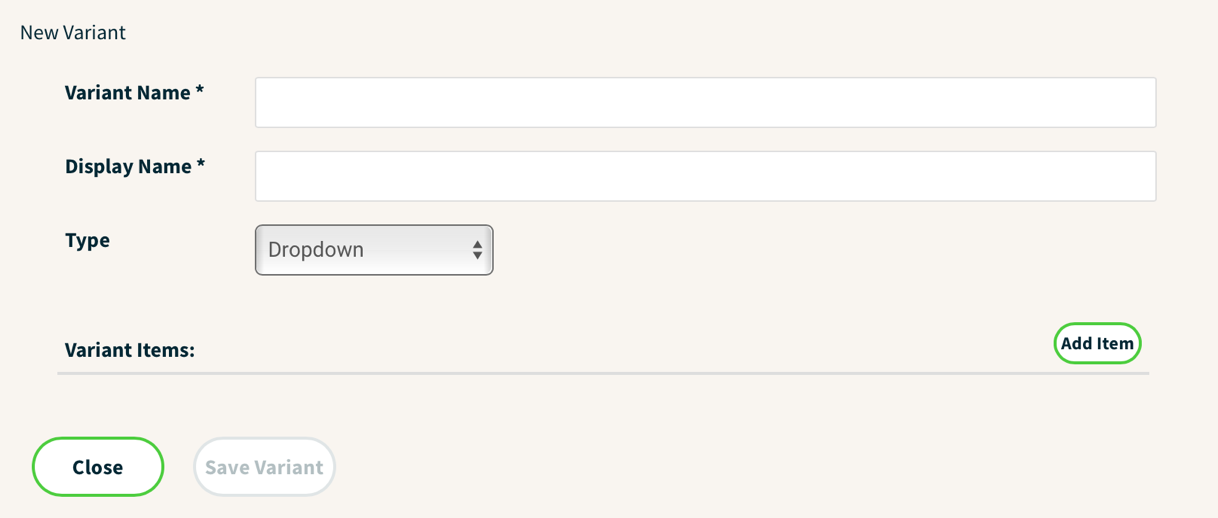
As with products, you can simply click New Variant to create a new variant that applies to your products. (Screenshot below.) The new variant entry screen has a few fields to fill out, including name, type, and any related products you want that variant applied to.
The convenient thing about the variants is that you can create them in the Product Variants section or directly from a product that needs a variant.
Reporting
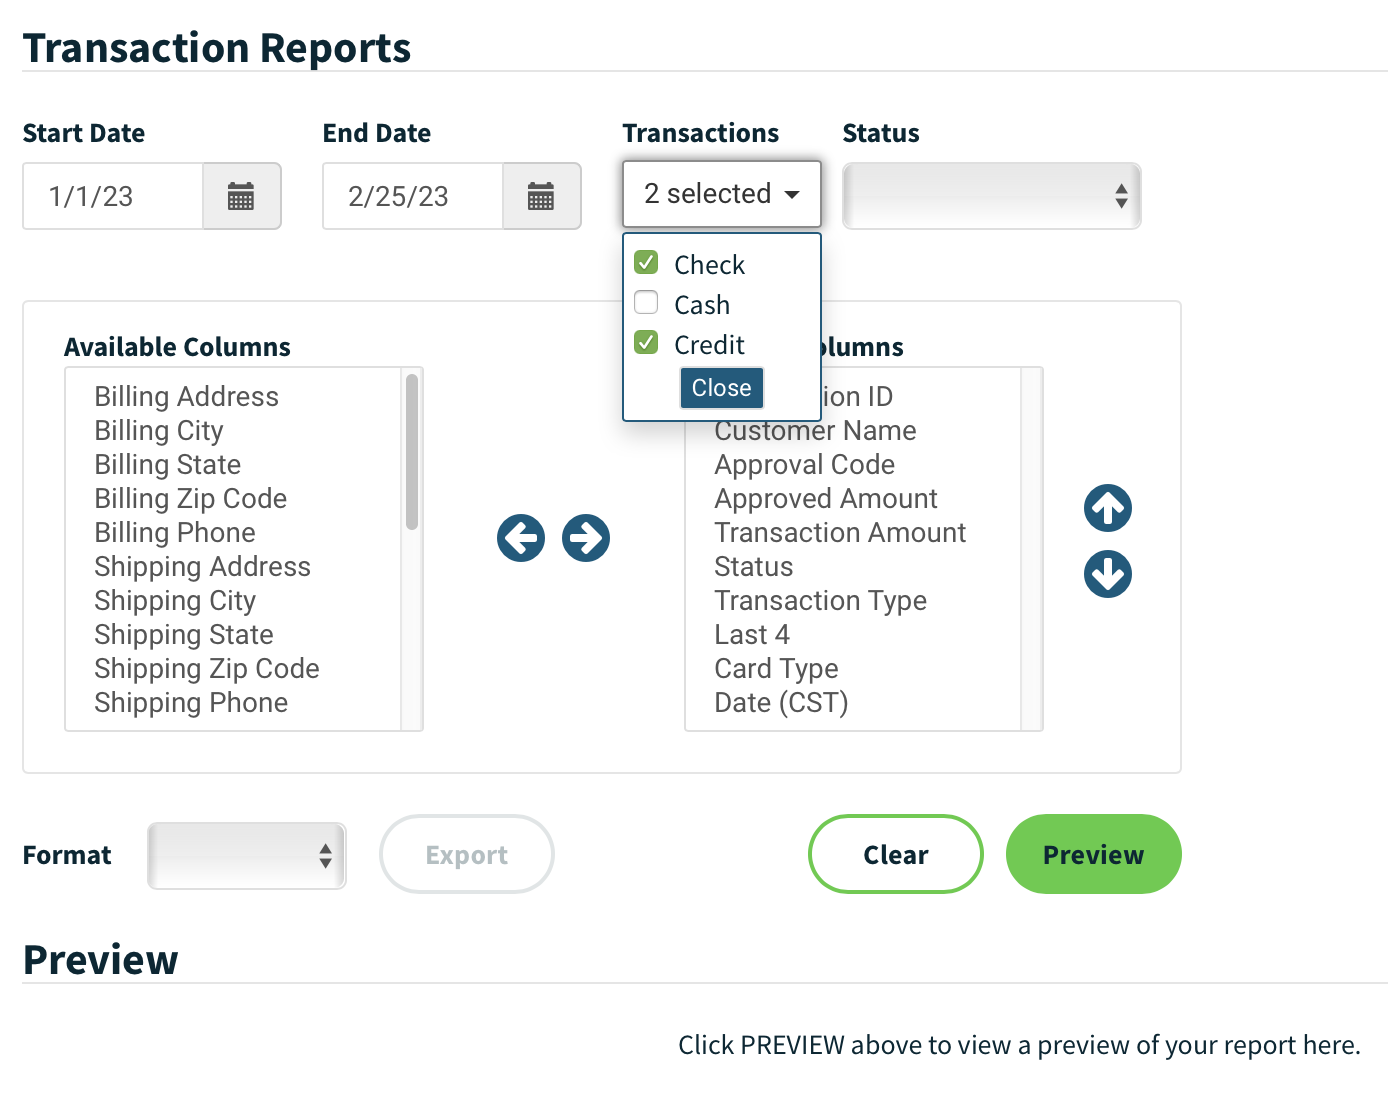
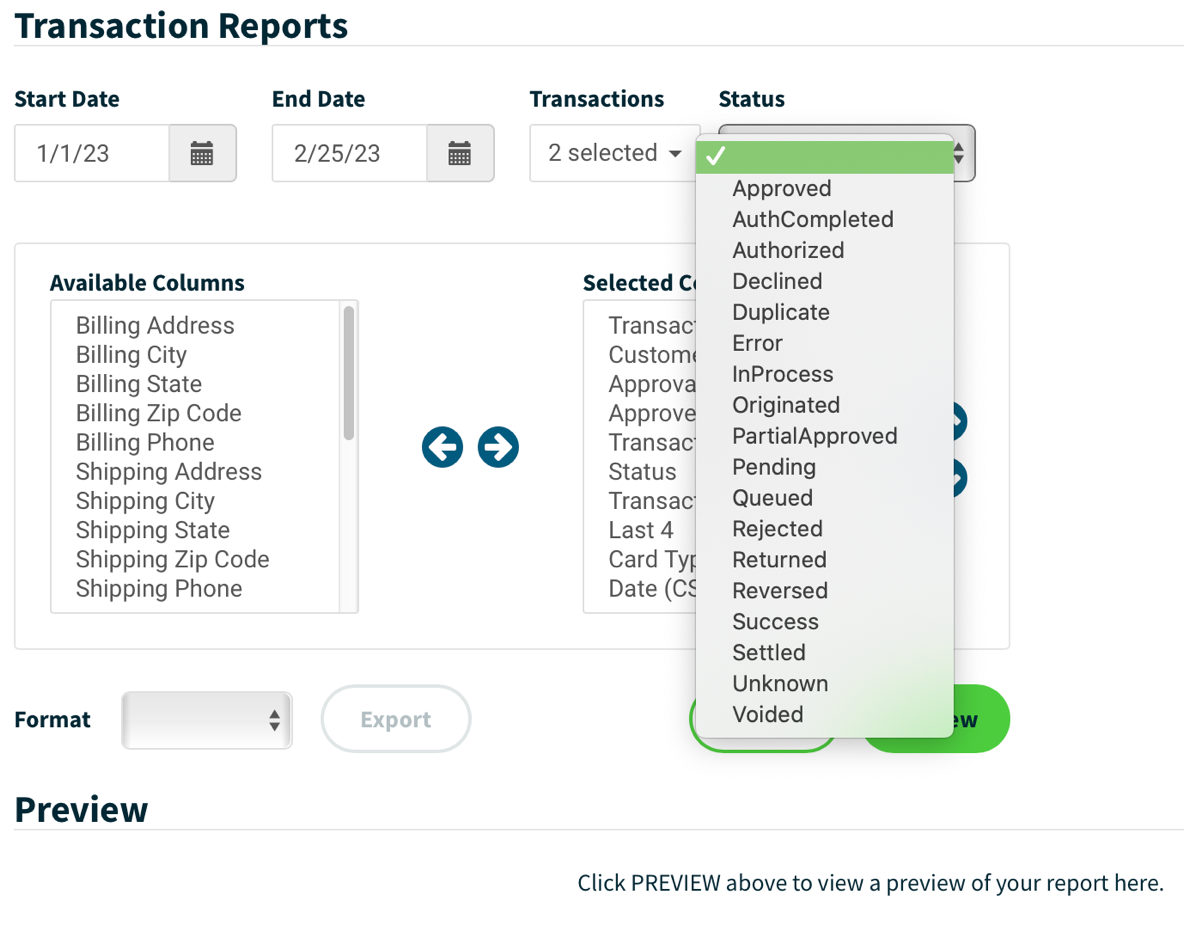
With any business or payment functions, reporting is key. Being able to quickly access transaction data and payment history can save time and headaches. The OmniFlex terminal offers customizable reports that let you choose a date range, types of transactions (cash, check, credit, or a combination), and status. (Screenshots below.)
You can optionally choose to include a variety of fields in the report that you create (screenshot below) to get the exact information you need. You can then click “preview” to see a preview of the report you’ve created to ensure it has exactly what you need. The “Format” option lets you export the finished report as a CSV file, PDF, or XML file for use in Excel, accounting programs, or other tools.
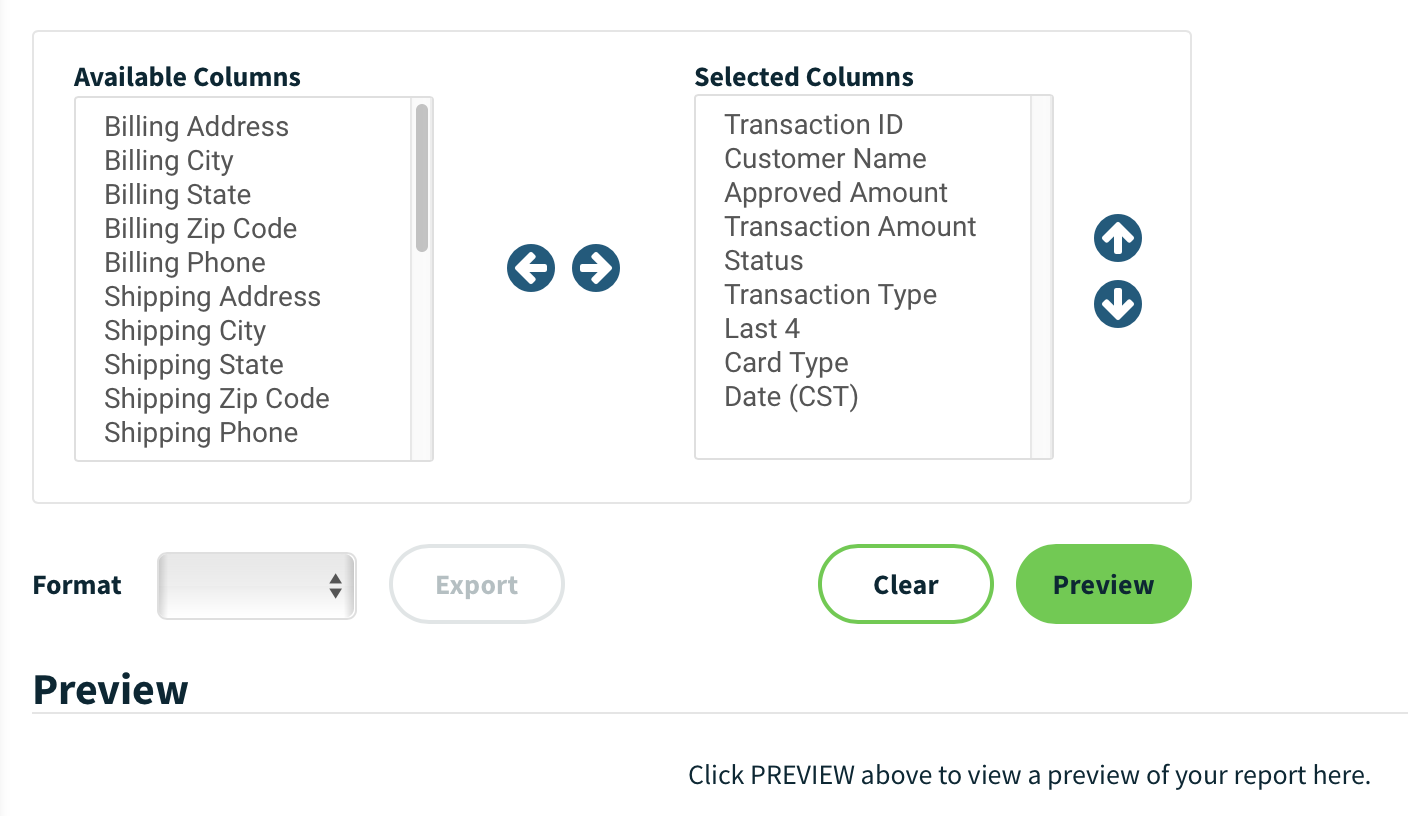
Clicking on criteria in the lefthand column and then clicking on the right arrow will move that data into the righthand column for inclusion in the report.
Processor Compatibility
OmniFlex is offered by Worldpay, a FIS company. It’s compatible with processors that utilize the Worldpay platform or available through Worldpay directly. Where you obtain the virtual terminal will also determine where you’ll typically go for customer service or assistance with the terminal, though the portal itself does have a support hub for some questions.
If you’re using CardFellow to find your processor and virtual terminal, give us a call for assistance.
Rates and Fees
So how much does the OmniFlex virtual terminal cost? There’s no single answer to that, unfortunately. As a virtual terminal that works with many different processing companies, there isn’t a fixed single rate. One company may charge more than another. Sometimes virtual terminals have a small per-transaction fee on top of the costs of accepting credit and debit cards; other times it’s bundled in with other costs. Virtual terminals may also have their own monthly fees, but not always.
If that’s not helpful, try this - You can see real, no-teasers pricing to use the OmniFlex Virtual Terminal at your business right here at CardFellow. Signing up for a free (and private!) account lets you request pricing from multiple processors, add preferred equipment, and compare rates and fees among several companies – all without the hassle of sales calls or being required to send in processing statements. Give it a try by signing up here.
Have you used the OmniFlex Virtual Terminal for your business? Help other business owners and leave a review!
Product Features
Selective: WorldPay
Virtual Terminal
- Batch upload transaction processing
- Recurring billing
- Level III data
